|
Update Your Boat's Windows
|
The appearance of many old sailboats can often be improved by completely
replacing the cheap aluminium framed windows with new plexiglass units. Such a project will also do much to eliminate leaks which may have developed with older windows that are beyond the point of simply being re-caulked.
I have installed exterior mounted plexiglass (acrylic) windows on
two of my previous sailboats - a 24 foot Venture 224 and a Tanzer 26 . The Venture
had a single long deadlight (a non-opening window) on each side of the
cabin, similar to what is found on many boats built in
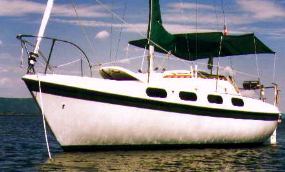 A Tanzer 26 with replacement windows.
 |
the late 1970's and early 1980's. By comparison, the Tanzer 26 has four smaller windows on each side.
With the Venture, I updated the look of the boat by designing and
installing long trapezoid shaped windows. There was considerable
overlap with the original window openings, but the new shape did
give the boat a modern appearance. With the Tanzer
26, I simply used one of the old aluminium frames as a template for
the new plexiglass windows (I added an extra 1/8 of an inch all
around just to be safe). Regardless of the window shape you chose
for the plexiglass, it is probably not a good idea to modify the actual window
opening in the boat's cabin walls. This could affect the structural integrity of the cabin and deck, and it could make it more difficult to obtain a nice finish with the interior installation of the new windows.
With both my boats, the overlapping plexiglass windows were applied
directly to the fiberglass exterior cabin walls with a high quality
sealant and round headed screws (or round headed bolts and nuts). I
completely discarded the old exterior aluminium frames. Over the
years these frames had been so heavily caulked, and re-caulked, that
they were almost impossible to remove without bending them into
pretzels. Even with the use of the sharpest razor blade knife I
could find, it took me close to two hours to remove one of the frames
from my Tanzer 26 without bending it completely out of shape. (I needed one for a
template). The removal of the other 7 frames was relatively quick -
they came off with extreme prejudice.
Whatever you do, be sure to carefully remove and save any interior
aluminium frames. These will probably be held in place only with screws
(and very little caulking). You'll need to reinstall these
afterwards for a nice finish inside your cabin.
On my Tanzer 26, I screwed the plexiglass windows in place on the
exterior cabin wall with the same holes used for the aluminium
frames. Since Tanzer manufactured my boat with plywood backing
around the window openings (the core between the fiberglass cabin
wall and the interior liner), I was able to use screws to install
the new windows. Without this wood backing, it may be necessary to
use small bolts and nuts to hold the windows in place. This is the
technique I employed with my Venture 224, and it is a little more
costly and time consuming. Whatever the case, be sure not to overly
tighten the screws or bolts or you'll risk cracking the plexiglass.
I used stainless steel 3/4 inch #8 screws. It's worthwhile to get
the phone book out and shop around for the best prices when buying a
large volume of stainless steel fasteners. I needed a box of 100
screws, and I found prices varied considerably, even among suppliers
servicing industrial needs. (In the Ottawa area, I found that Valley Hardware has an excellent selection of stainless steel fasteners at good prices. 613-225-0293.)
The biggest secret with this type of project is to have your
plexiglass supplier do all the tricky work that goes into
manufacturing the new windows. In other words, the supplier will cut
the windows to shape and drill uniformly spaced holes (2.5 to 3
inches apart, or spaced to match the aluminium template). Also ask
them to bevel and polish the outside edge around the windows. Note
that depending on the shape of the windows (e.g. trapezoid shaped
windows), the bevelling will have to be done on the opposite edges
when making port and starboard windows.
Costs? Even with all the work that went into making my eight
plexiglass windows, they only cost me around $120 Canadian (in 1996).
And it may have been possible to save a few bucks by shopping around. See the Yellow Pages for plastic suppliers in your area, or see "hardware supplies" in the directory of "Services and Businesses".
I have had good results using the darkest smoked plexiglass
available. The dark colour will hide the outline of the window
cutout on the cabin wall, but dark plexiglass always looks much
lighter when you are inside the boat looking out. I chose to go with
plexiglass with a thickness of 3/16 of inch, although 1/4 inch is
also an option. It's interesting to note that the original
plexiglass for the small windows on the Tanzer 26 was only 1/8 inch thick. In terms of strength, my plastic supplier also stated that 1/8 inch thick plexiglass is all that I would need,
even though he had no information on the thickness of the
original
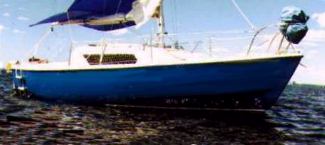 A Venture 224 with updated windows.
 |
windows. However, for appearance purposes, he recommended
3/16 plexiglass.
I used a high quality black marine sealant which is compatible with plastics
(such as Life-Seal) to caulk the windows in place. Black is the colour sailboat manufacturers tend to use when
installing these types of windows at the factory, and it's colour
which hides itself well under the dark smoke plexiglass. The only problem
with black caulking is that it is very noticeable if it oozes out
past the window edge as the plexiglass is pressed against the white
cabin wall. This can be difficult to control - for starters, try a bead of
caulking a little less thick than the diameter of a pencil about 1/2 inch from the edge
of the window. This has to be applied smoothly and, as much as possible,
in one continuous flow. This is not always easy when working with a manual caulking gun. Experiment a little before starting with your first window.
Note that the sealant should be applied to the back of the window,
and not the exterior cabin wall. And you should also have the screws
or bolts ready as you press the caulked windows into place. Needless
to say, this aspect of the project is definitely a two person job.
It is also wise to prefit all windows before proceeding with any
caulking. Once you get going, it doesn't take too long to fit the
windows in place. My wife and I installed eight windows on our
Tanzer in about 2.5 hours.
One word of caution about the installation of plexiglass (acrylic)
windows. It's important to have your plastic supplier drill slightly
oversized screw holes in the plexiglass windows (the caulking will
fill in the small gap). This will allow the windows to expand or
contract under the hot summer sun or in freezing winter
temperatures. Otherwise, there is a chance your windows could crack
after a year or two.
And finally, a word about plexiglass (acrylic) and Lexan. Plexiglass
is relatively cheap and scratch resistant, but it can crack if
stressed the wrong way. Buffing and polishing can help eliminate small scratches
and restore a clear finish on dull plexiglass.
Laxen is very strong (sometimes referred to as
bullet proof plexiglass), but it is relatively expensive and has a
softer surface which scratches easily. Unlike plexiglass, heavy duty
buffing and polishing can never fully restore
a clear finish to lexan once it has been scratched or becomes dull with age. On the other hand, there's little need to worry about your windows cracking when using Lexan. Moreover, bolting on 1/4 inch lexan windows would add to the strength of the boat's hull and cabin structure.
Good luck,
Text and photos by Michael McGoldrick.
[ Copyright & Disclaimer ]
